

Use the Sitonline platform to create photo gallery pages entirely dedicated to your images.

Enter the website pages section on your control panel and click one of the green [+] icons to add a photo gallery page, or click the “Create a photo gallery” link at the top of the home page.
In this page you can create an infinitive number of albums of images to make your site suitable for presentations, photograph albums, event slideshows, etc…
To create a new album click the grey “Add Album” button at the top left corner of each photo gallery page. A “Photo album Management” window will open and in there you can insert the name and description of the album and select the images you want to uploaded. For each selected image the system displays the weight of the file: to upload the image press the “Proceed” button.
Formats for the images supported by the system are: JPG, GIF, PNG.
The system also supports the uploading of compressed ZIP and RAR files of images that you can insert in the album. For each single photo album you can upload up to a maximum of 60 images.
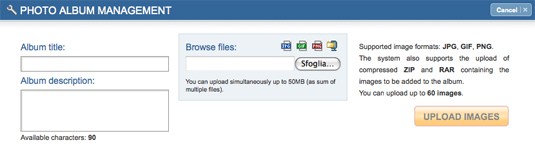
Maximum file size (total files) that can be uploaded simultaneously is 50 Megabytes. If it’s necessary to upload files exceeding the maximum size, the package should be split into others of less than 50 Mb, so that they can be uploaded properly on the platform.
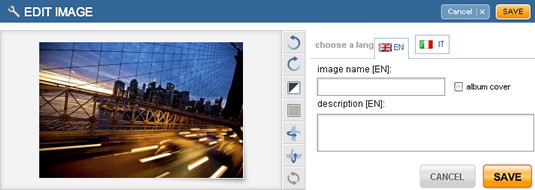
If the Multi-language option is active, the text information can be varied for each language.
If some albums have been created in different photo gallery pages, you can select one of the already existing albums from a dropdown menu in the “Photo Management” window. In this way you can copy it in the new photo gallery page.
You can add an album once only for each language.
After loading one or more images, in the edit section will also appear the “Photo Management” window.
Use this to edit, add or remove one or more photos in the album.
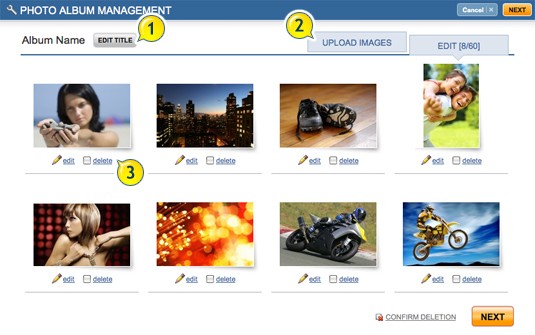
You can access this section at any time by clicking the “Insert/edit contents of album” icon at the top of each album located in the photo gallery. If you are in the album’s detail page, you will find a grey “Album Management” button.
Click and drag the image to change its position in the album.
Select “Delete” to cancel the images.
Click edit to change (for each language) the name and description of the image, select the album cover or make graphic changes to the photo (rotate, reflect or colour the image in black and white, etc.)
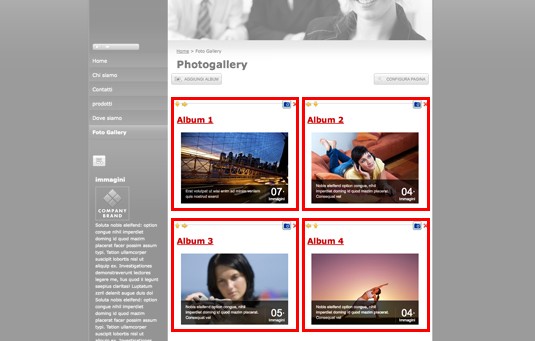
All the uploaded albums will be displayed on the photo gallery page, along with an image of the cover you have chosen and the number of photos contained in the album. By clicking on the album the system will display all the uploaded photos and by clicking on a single photo a detailed page with the original photo will be displayed. Previews of the images before and after the one displayed will also be shown on the detailed page.
The system will also display albums full screen: to start this presentation click the slideshow button at the top right of each album.
On every photo gallery page there is a grey “Configure page” button ( top right corner), it enables you to personalize the display of pages, albums and single photos:
1. First decide the layout of the boxes (albums) on the photo gallery page, by selecting the number of lines and columns to arrange the pictures.
2. From the dropdown menu select the order of the albums on the page (first the most recent, or in alphabetical order, etc…)
3. With regard to album options, you can select the number of columns on which the photos are arranged on the first page of each single album (3, 4 or 5).
4. The image preview format can be either squared or original. If you select the squared format, the system will trim the preview automatically, otherwise the original proportions of the photo will be maintained.
5. Then select whether to display automatically one or more previews of the other albums on the side bar of the album viewed by the user.
6. For functions related to single images, you can decide to publish the photos in their original format, to be displayed by clicking on the photo’s detail page.
By activating this option you will use a lot of disc space
7. You can also decide to start the slideshow automatically (after clicking the slideshow link) and you will be able to set the time between images (default 5, 8, 10 or 15 seconds).
8. Finally choose whether to display on the website’s home page a preview of the albums. A maximum of 10 previews can be inserted for each photo gallery.
The albums created in a photo gallery can be uploaded in the red boxes of the standard and advanced pages. If you want to know how to do it go to the “insert an album” section of our guide.
