


Our contact page has three main elements. At the top of the page you can see the section dedicated to your references and to all the ways your visitors can get in touch with you, like your phone number, fax number, mail address and so on…
The second element is the toll-free call service which allows your customers to contact you via phone while keeping your phone number private.
The third element is the main feature of the contact page: the customizable form. Through this tool you can receive messages, inquiries, reservations, carry out orders and much more. What you will receive, depends mostly on how you decide to set your contact form.
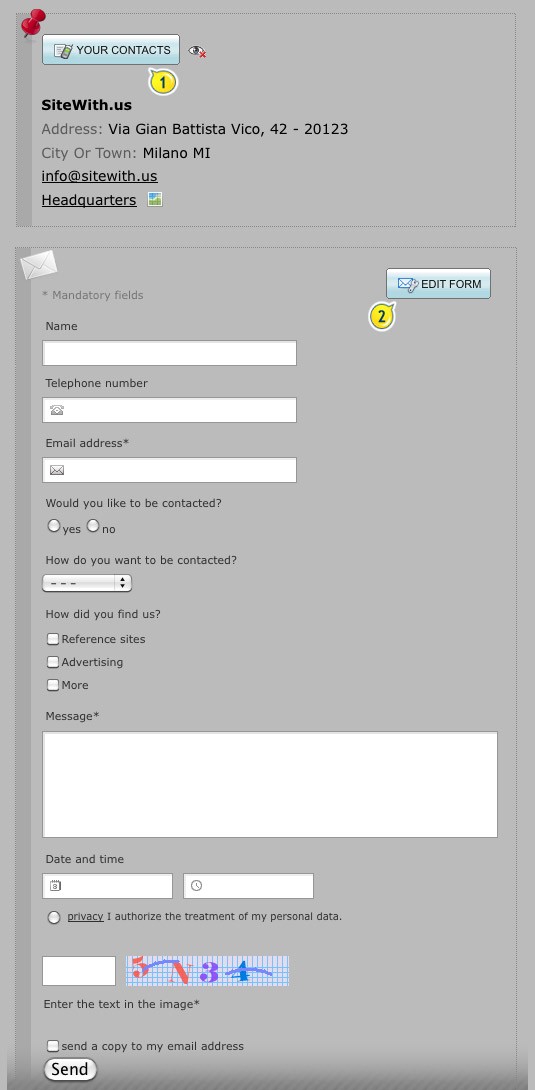
If you access your Site Panel and then go to the Contact page, you will find the two options to manage each tool: Your contacts (1) and Edit form (2).
By clicking the Your contacts (1) button you will open a section in which you can insert all the contacts people can reach you at.
In case your company has more than one address, you can also add all the details of the second address.
If you need a field that is not present in the contact form, we suggest you add it in the “business description” field.
Once you save all the changes you made, they will be displayed in the contact page for your visitors to see.
By clicking the “eye” button, which is located next to the “Your Contacts” option, you can activate and de-activate the box that displays your data in the page.
The main feature of the Contact page is the form, because it allows your visitors to send you all the data to an email address of your choice. They will be able to do so by filling a series or pre-defined fields like name, last name, phone number and so on…All those data will be translated into an e-mail that will be sent to an address of your choice. All the fields of the form are customizable through the labels and the different elements available (text field, drop-down menu, multiple options and so on…).
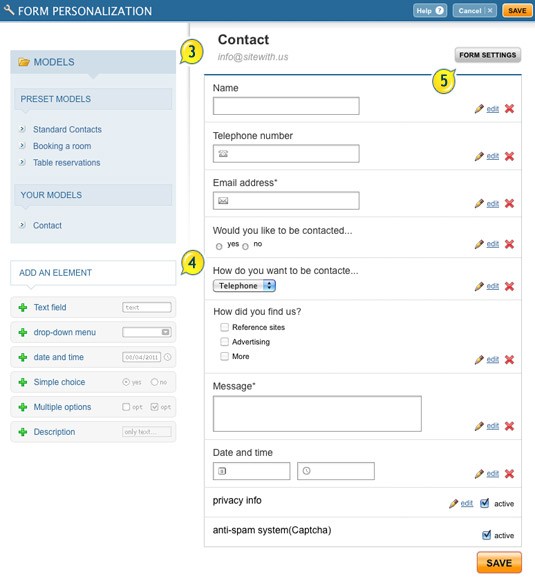
When you create a contact page, you will see that a form is already present: all you have to do to change it according to your needs is click on the Edit Form (2) option.
In the window that appears you will be able to change the pre-existing fields, by pressing the modify button that you can find next to each one. You can also delete some of the voices with the red X.
The Models section (3) includes a series of already-made fields and your personalized ones. By choosing and clicking on the model you want, you will be able to see a preview. To show this new model in the contact page, all you have to do is click on the apply model button.
If you choose a model that is active in the same language of the form you are modifyng, this will be automatically repeated. While, if you choose a model written in another language, you will have to select the proper option to relate it to the original one.
Through the window that allows you to customize the form, you will be able to add additional fields to your page with the Add element (4) menu.
You will be able to choose among these elements:
- Text field: this feature will allow you to insert simple texts. It will also allow you to choose the input and the icon that will be displayed in that particular field. This input can be simple (letters, numbers or special characters), numerical or long to insert more complex sentences or texts.
- Drop-down menu: a typical internet feature that will allow you to choose from a series of elements. You will be able to select only one of the elements of the menu though.
- Date and time: through this feature you can choose a date and a time for the form. It might be a very useful option in case you use the form for reservations or orders.
- Simple choice: it allows you to put out a “yes” or “no” choice.
- Multiple options: through this feature you will be able to insert and infinitive number of fields for any purpose.
- Description: it allows you to insert any kind of text in the form. It can be used to provide your visitors with additional details or explanations that might be useful for them.
In every form there are two elements that users cannot delete, they can only activate or deactivate them: the Privacy Information and the Anti-Spam System (Captcha). The Privacy Info section explains to each visitor or client all the criteria used by the manager of the service to collect information through the contact form. It also explains how, after all the fields have been filled out, each message is sent to you. If the privacy option is active, the visitor must flag it if he or she wants his/her message to be sent to you. The second option (the Anti-Spam System) allows you to insert a random image, automatically generated by the system, to validate the form. This image has to be copied by the visitor in the appropriate field so the server can validate it. If the image is not repeated exactly the way it is shown, the visitor’s message won’t be sent and the potential client will be required to try to insert it again.
As already stated, each element of the form can be personalized by pressing the modify link that you can find next to each field. You can also change the label of each element. Each field can also be turned into a mandatory one (in this case next to the label a star will appear, to underline the fact that the field is mandatory). Along with these features, other options will be available.
You will be able to move each field at the top or at the bottom of the form: this is possible if you click in the middle of the field with the right button of your mouse and move the field where you want it to be. Note: The “Privacy Info” button and the “Anti-Spam” filter cannot be moved around the page.
By clicking on the Form settings (5) at the top right corner of the page, you will be able to modify the name of the form and the e-mail address to which the messages are sent. You can also modify the message that will be shown to your visitors after the form is completely filled and the message is sent.
Furthermore you have the possibility to read all your messanges that visitors have sent you through the contact form, directly from your control panel. This will be possible through the messages section. To read those messages, you have to access the control panel and then click on the “Read the site’s messages” icon that you can find right above your site’s address. If you have messages to read, instead, the icon will say “1 message to read“.
