

The Website pages section has two basic functions: it enables you to create, delete, move, activate and deactivate the pages and gives you an immediate overall view of your site’s structure (number of pages, sub-pages, etc…)
There are two ways to access this section:
A. Enter the control panel and click “Page management”.
B. From the site panel, click “Site pages” on the bar at the top.
The structure is displayed on the page as an intuitive pyramidal diagram.
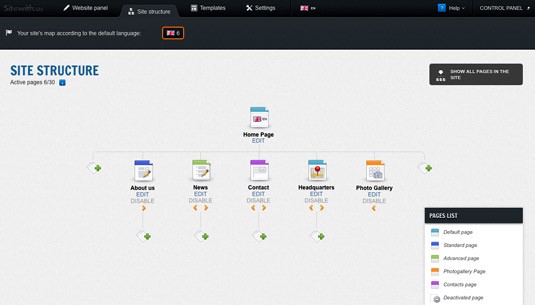
The top is represented by the home page of your site and it is the first thing that visitors see of your site when they reach it with the internet address.
The first level instead comprises the pages that make up your site’s main menu, while the second level comprises all the sub-pages (of each main page).
A different number of levels is available depending on the type of subscription you purchase. The Start package, for example, has only one level (therefore you cannot create sub-pages for first level pages – for example, “About Us”); the Professional package offers 2 levels, while Premium offers up to 4.
There are two ways of displaying the diagram structure. If you click the zoom icon (at the top of the screen on the left) you can display only the first level, or you can view the entire structure by clicking again the zoom icon. The first mode will display a green arrow under the pages containing the sub-pages. Click this arrow to view details of the page.
The structure page includes a series of different coloured icons, to facilitate their immediate recognition. Each icon represents a different type of page:
Home page (Bright blue icon): this page cannot be deactivated or cancelled.
Technically it is identical to a standard page.
Standard page (Dark blue icon): consists of 5 red boxes which can be arranged on the page in 3 different ways.
Press the “Page Settings” button to select one of the layout: “simple”, “in evidence” or “important”. They are mainly used for contents that are seldom updated. See “Further Information on the Standard Page” for further details.
Advanced Page (Green icon): can contain an infinitive number of red boxes. In each box you can fit text, an image, a video, an attachment, etc.
It is highly recommended for products presentations or for pages that are frequently updated (e.g. news), including blogs.
In each box of the advanced pages you can insert comments, dates of publication or activate a summary containing details on the content of the box. If the summary is active, only the title and a short description (text + preview of an image) will appear in the advanced page. Click on the preview to open a page of details containing further information on that box See also “Further Information on the “Advanced Page” for further details.
Photo Gallery (Orange icon): enables you to create a page entirely dedicated to your photos.
In this page you can enter infinitive albums. It is very useful for presentations, photographic albums and even slideshows, etc. See also “Further Information on the Photo Gallery Page” for further details.
Contact page (Purple icon): allows your visitors and potential customer to contact you and a customizable form through which you can receive messages, inquiries, orders, reservations and so on…
Headquarters page (Light blue icon) in this page you will find a box with your address and the Google Maps’ map indicating the location of your choice.
To configure it, enter the “Where We Are” page, click the “Configure Map” button and compile the required fields. This page is already active in your site and you cannot add more than one. In case you decide you don’t need it, you can always disable it by clicking on the proper link.
Deactivate Page (Grey icon): a deactivated page is a page of your site that is not displayed online and cannot be modified until it is made active. Furthermore a deactivated page is not included in the total page count for your site which, depending on the package you purchased, may have a limit.
When a page is deactivated, a “Cancel” option will appear. Press it if you want to delete the page forever with no possibility to recover it. This option is not allowed for the Home Page, Contacts and Where we Are pages.
You can also add new pages from the Site’s pages section.
For first level pages, click one of the two green [ + ] icons at the side of the level.
To create a second level page, click the green [ + ] icon below the first level page in which you want the page to be added.
By clicking on the icon of the page you want to create, you will be asked to name the page (which can be changed by entering the page in question and changing the relative field) and to choose a type (standard, advanced or photo gallery).
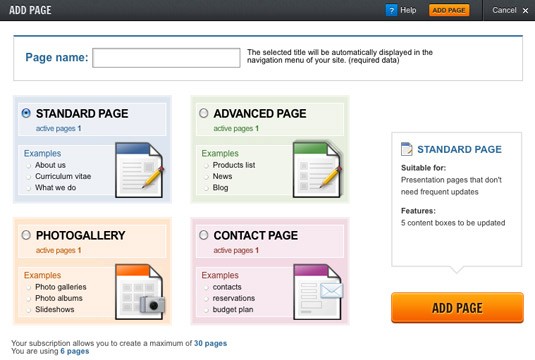
A standard page cannot be converted into an advanced page or into photogallery page or vice versa.
Once the number of pages made available for your package are over (which vary according to the type of subscription, as for the levels), it will be impossible to add new ones by clicking the [ + ] icon. It is necessary to pass to the next package which will enable you to create a greater number of pages.
The pages can be moved on the same level (horizontally) but not from one level to another (vertically).
This is an important option since the layout of the pages contributes to the formation of the navigation menu in your site.
The main menu comprises all first level pages (below the home page) and the order of those pages on the menu online is decided by the order they have in the diagram from left to right.
The same applies to the second level menus, which are displayed in the site only on those pages to which a further sub-level has been applied.
If the multi-language option is activated, a site’s structure page is visible for each language. To pass from one structure to another, just select the language, by clicking on the icon of the corresponding flag on the bar.The structure created for a language is independent and cannot be repeated for all the others.
For example, all pages created for the italian section will be displayed only for the italian version and those created in English will be displayed only in English.
